About
What is this
This guide offers practical advice for parents caring for a newborn.
This isn’t about vague parenting concepts, it’s about concrete day-to-day things like: safe sleep, feeding schedules, transportation, choosing baby formula, breast pumps, things of this nature.
Any claims and recommendations come from reputable sources like
CDC: Centers for Disease Control and Prevention, World Health Organization (WHO)
and various government health agencies around the globe.
Citations and links to the original reference research papers are always included.
You won’t find any paywalls, affiliate links, or sales pitches here. Operating entirely without profit should assure you, the reader, there are no competing interests or hidden agendas. This is strictly a passion project.
No AI was used in writing this.
Note
I am not a health care professional not I work with infants in my day-to-day job. I am however skilled at reading, understanding and explaining dense research papers. I am a both a parent and I had a vested interest to do the right thing.
You are likely reading the unfinished version of this page, expect some rough edges.
For corrections, questions, feedback, requests and anything else open a new issue or pull request here.
This work is licensed under a Creative Commons Attribution 4.0 International License.
Safe sleep
This grim but likely most important topic you need to know as a new parent.
Sudden infant death syndrome SIDS is an umbrella term for a child under 1 year of age inexplicably dying in their sleep. While the exact cause is unknown, several risk factors were identified and guidelines for prevention issued.
In 1994 the US National Institutes of Health launched the Safe to sleep/ Back to sleep public information campaign which resulted in significant drop in SIDS incidence. Most of the recommendations from health agencies world-wide are based on it.
In 2022, the chance of being affected by SIDS in the US was 0.042%. In europe the data from 2018 shows a probability of 0.015%. The risk is low, but the guidelines have been proven to work, be sure to follow them.
Note
While I researched this topic extensively, I am not an authority on the subject. I include the breakdown of “why something is dangerous” as I think it is useful for decision-making, but I do not claim any special expertise. This topic is important enough for you to double and triple check it with your pediatrician.
Place baby on their back for sleep
Young babies can not roll or reposition by themselves. Placing them on their back(supine position) ensures their airways are straight and the parent does not accidentally obstruct their breathing when putting them down. Additionally, the supine position minimises the risk of rebreathing previously exhaled air that is depleted of oxygen.
Once a baby gains the ability to roll on their front (3-6 months) they might choose to sleep on their front, you don’t need to re-set them to their backs. If the baby got into a position by themselves they should be able to move away from it if they need to.
- This applies for all sleep times including naps.
- You should insist that all caretakers put the baby to sleep in the supine position
- A swaddled baby should never be put sleep on their front.
Use a firm flat mattress
If the mattress is to soft the baby’s face can sink into it and cause rebreathing of oxygen depleted air.
Fortunately the majority of developed countries heavily regulate baby sleeping surfaces. For example in the EU the EN 16890:2017+A1:2021 requirement for “Mattresses for cots and cribs” amongst other hazards, specifically tests the mattress hardness. It is illegal to sell baby sleep products on European markets without passing this certification.
If it’s a cot or a bassinet brought from a developed country, more than likely the mattress is both firm and breathable enough to be safe.
Avoid antique or DYI mattresses and beds. These did not pass any regulatory testing and also might use prohibited/dangerous materials like formaldehyde or led paint.
In case you need to check the firmness of particular mattress, there is a mattress firmness test you can perform at home.
Infant car seats and other products not designed for unsupervised sleep operate by different rules.
Avoid cosleeping
Share the room, not the bed. Bed sharing aka co-sleeping is another major risk factor. Many people do it and get away with it, that does not mean it’s a good idea.
- A sleeping adult can roll over the baby suffocating them.
- The baby might get tangled on loose bedding like pillows/blankets/sheets etc.
- Baby can fall off the bed.
- Adult mattresses are too soft which is a suffocation hazard if the baby ends up on their front.
I recommend investing in a “sidecar bassinet” (one side of the bassinet is removable or slides down). Installing it next to your bed gives you easy access to the baby at night. It is designed for newborn sleep: mattress is firm, you can’t roll over them, there is no risk of entrapment. This gets you very close to the convenience of co-sleeping without any of the risk associated with it.
Sharing the room is recommended, it is both convenient and allow you to check on your baby during the night.
Avoid crib clutter
Items like pillows, blankets, plush toys pose suffocation risk.
Use a fitted sheet over the mattress and swaddle your newborn with a weather appropriate blanket, that’s it. If you don’t want to swaddle a sleeping bag can be used.
It does look a bit spartan, but im 100% convinced the baby does not care if they have a nicely decorated bed or not.
Cot bumpers posing the same risks and are banned in US since 2022.
Avoid overheating
Young babies have poor temperature regulation, they loose heat quickly but also overheat easily. Overheating is another major risk factor for SIDS that can easily be avoided.
- Avoid placing the bassinet next to a heat source (like a radiator).
- Take off baby’s hat while inside.
Our pediatrician recommended to keep the inside temperature around 21 degrees Celsius and dress our daughter with 1 layer more than we are wearing.
A baby that is too warm will have sweaty back of the neck and their cheeks will flush red. In more severe cases their breathing will become more rapid. A baby that is too cold will usually complain by crying and their cheeks and chest will be cold to the touch. Cold feet and hands are a bad indicator for a baby being cold, their circulatory system is immature and their feet and hands will be normally colder than an adult’s.
Where I am from (eastern-central europe) people tend to overdress their babies both inside and outside. I’m with reddit on this one: Slightly cooler is always better.
Avoid secondhand smoking
Even after airing out the room the tar from smoke accumulates on surfaces and also counts as second-hand smoking (even if there is no direct smoke inhalation),
Pacifier use is recommended
“Published case-control studies demonstrate a significant reduced risk of SIDS with pacifier use, particularly when placed for sleep”. source
There are some caveats when it comes to pacifiers, breastfeeding and mouth development. Read the chapter dedicated to that before introducing a pacifier.
Avoid baby containers (baby nests/pods)
Several products exist on the market which are advertised “for baby sleep”. Some of them even go as far as to claim they reduce the risk of SIDS when in fact it is the opposite. These products are not regulated the same way bassinets and cots are.
Canada recalled several products in this family specifically because they pose an elevated risk of entrapment.
When to stop worrying about SIDS
While SIDS is uncommon after 8 months of age parents should still follow safe sleep recommendations until 1 year of age.
With regard to SIDS specifically, 90% of cases occur before an infant reaches the age of 6 months. SIDS peaks between 1 and 4 months of age and is uncommon after 8 months of age AAP Journal 2022 e2022057991
NOTE: The term “SIDS” applies only to infants younger than 1 year of age. As your child grows older they become more resilient to dangers like positional asphyxiation, but they still can get entrapped in the bedding structure or loose bedding. PMID: 10520608
Even after one year you should assess the risks whenever changing the sleeping arrangements.
Annex: SIDS and predatory advertising:
SIDS is very scary (I am reliving the stress even when writing about it) and there are actors trying to capitalize on your fears.
I remember receiving many ads for gadgets that claim to prevent it: oxygen monitors, inclined sleepers, smart baby monitors with breathe rate detection and all other kinds of similar snake oil. These will be advertised as “the definitive preventative measure”, but when inspecting the fine-print you are guaranteed to see keywords like “for comfort” or “fitness tracker” or “not a medical device”.
None of these passed any sort of certification. The ads can claim anything but if something is legally classified as and “infant lounger” (as is the case for the baby nests) it can skip all the testing that is legally required for baby sleep products.
At best, they do nothing, at worst they are actually putting your newborn in danger. For example did you know that oximeters can cause skin burn if not used correctly?
There are currently no commercially available products that can prevent SIDS.
There are of course medical cases where special monitoring products are needed, but in this situation an actual medical professional will tell you exactly what to use, where to rent it and how to use it correctly.
Swaddling and sleeping bags
Swaddling has two purposes: It keeps your baby warm, and helps with the baby’s startle relexes.
Since loose blankets are not recommended under safe sleep guidelines, use a swaddle or sleeping bag as a safe alternative for warmth.
Babies under 6 months will do sudden arm movements during their sleep, this is called the Moro reflex and is both normal and expected. However, their own movement can wake up a sleeping baby. Restricting their range of movement generally make a newborn move comfortable and makes them sleep better.
Swaddling is optional and brings no extra benefits other than comfort, you can use a sleep sack as early as you want. For example my daughter hated being swaddled and kept wiggling herself out, we transitioned to a swaddle sleep sack during first or second week after arriving home.
Safety considerations
Immediately stop swaddling as soon as your baby starts showing signs that they will start rolling on their own. Rolling on their face while swaddled is dangerous.
Always put your baby to sleep on their back, this is especially important for swaddled babies as they can’t move their arms to push and reposition themselves.
Don’t wrap the legs. The baby’s legs and hips should have full range of motion.
“Traditional swaddling, which implies restrictive immobilisation of the infant’s lower limbs with the hips in forced extension and adduction, has been shown to be a risk factor for Developmental Dysplasia of Hip”.
In my understanding this was a common practice back in the day and still is somewhat common in some parts of the world.
Be careful with well-intentioned but outdated advice on this
These safety rules also apply to “swaddle sleep sacks” or anything that restricts arm movements. Once a baby can “get face down” limiting their arm movement becomes a SIDS risk factor.
The old school swaddle
Versatile and cheap but most technical option.
Here is an excellent YouTube tutorial from TheDoctorsBjorkman.
Great channel and learning resource by the way.
Around the chest the swaddle should be tight, but not as tight as to restrict breathing.
Two or three fingers should fit between baby’s chest and the swaddle, this is known as the “two finger rule”.
Do not wrap the legs.
Velcro swaddles
Same as an old school swaddle but much easier to use. Does not require any dexterity to use and does not/should not allow you to use it incorrectly.
Unlike old-school swaddles, velcro swaddles come in different sized for different baby height and weight.
Swaddle sleep sack (arms-up design)
These are a middle of the road option.
They provide enough restraint to prevent the Moro reflex from waking up the baby, but they still allow some level of movement for babies that do not like being fully restrained.
In our personal case this option worked best: my daughter hated being motion-restrained and had a strong preference to sleep with her hands up.
This looks more like a sleeping bag, but it is still a swaddle and use should be stopped when baby shows signs of rolling.
Some models labeled as “transition bags” allow the option to have one or both arms out of the sleeping bag. This is useful for accommodating your baby to standard non-swaddle sleep sack.
Sleeping Bags
Transition to these when your baby starts showing signs of rolling on their own. At this stage (usually 4-6 months) free arm movement is important for safety and the Moro reflex will mostly disappear.
These can be used up to any age.
TOG rating
A sleep sack or swaddle will normally come with a TOG rating (Thermal Overview Grade).
This should tell you what the ambient temperature this sleep bag was designed for, higher the TOG the warmer the fabric.
While a good point of reference there is no “official” chart telling you which TOG to use for each ambient temperature. Different manufacturers will publish their own charts, which will slightly differ.
Use the TOG rating as a general guide, not as something written in stone. Check baby’s chest and back to gauge if they are too cold or too warm and adjust accordingly.
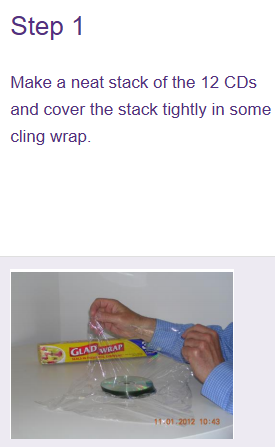
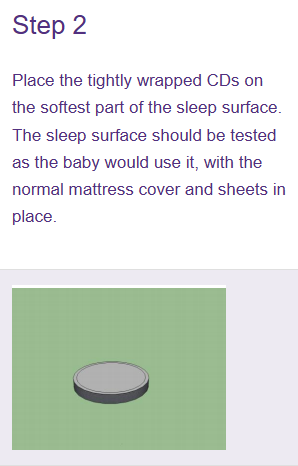
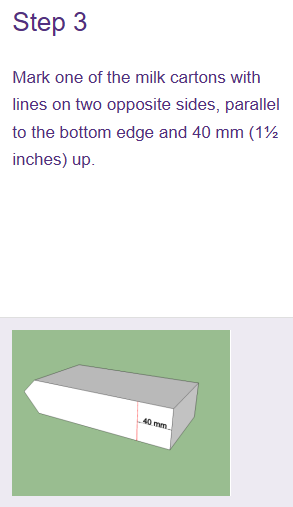
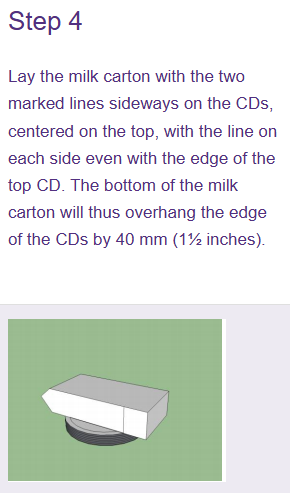
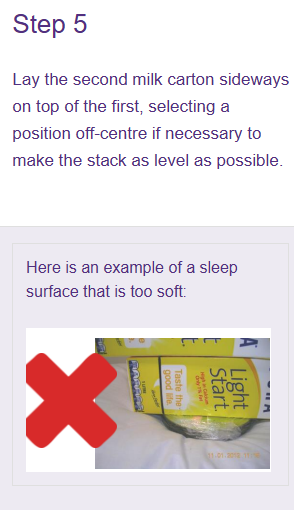
Mattress firmness test
This test determines if your mattress is firm enough to prevent re-breathing. If at all possible children especially under one year should sleep on certified baby sleep products, which makes this test unnecessary.
That said there are cases where being able to tell if a mattress is suitable for infant sleep can be useful. The most common case would be transitioning to a montessori bed, which require adult-size mattress.
Instructions on how to perform this tests can also be found here Infant sleep safety: testing for correct mattress firmness. on the Education Standards Board(ESB) of South Australia webpage.
This methodology was submitted in Australian and New Zealand Journal of Public Health“ in 2012 by Ronald L. Somers
According to the author, this substitute matches to a high degree the results produced by a specialized device used in
“The German case-control scene investigation study on SIDS” by Schlaud M et al.
I can’t find the original Schlaud paper, but it is quoted in
A firm recommendation measuring the softness of infant sleep surfaces by Sheena H. Gillani et al.
Schlaud et al. found that 27 of 41 (67%) scene investigation mattresses had > 14.5 mm indentation
...
a surface with an indentation of > 14.5 mm was significantly associated with risk of SIDS
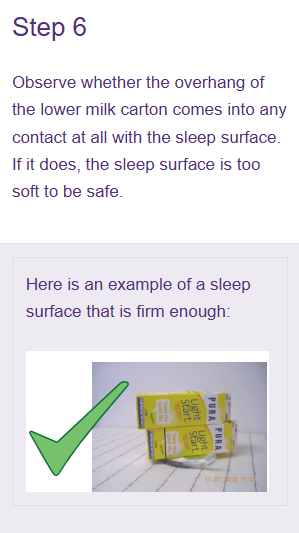
In essence:
- The surface area of the DVD paired with the weight of the milk cartons (2,325 g) simulate the weight distribution of a baby’s head.
- The thickness of a DVD is 1.2 mm, a stack of 12 DVDs is 14.4mm in height. Which matches what was assessed as the maximum safe mattress indentation in the by Shlaud M paper.
- Hence: If the 12 DVD stack fully sinks into the mattress it can be concluded that the mattress is too soft and should not be used for infant sleep.
Pacifiers
Deciding if you should introduce a pacifier and when to do it is highly situational.
Yes, offering a pacifier before sleep is recommended by the safe sleep guidelines, but the same public health officials acknowledge that introducing one too early can have negative effects on breastfeeding (if this is one of your goals).
In this chapter I will outline the key factors at play, so you can decide for yourself what to do.
In addition, I highly recommend reading the Recommendations for the use of pacifiers from the Canadian Paediatric Society as it treats the topic in much more depth.
Safety and general considerations
Independently of pacifier type and when it is introduced there are some safety rules that must be followed.
Safety
- The pacifier shield should be large enough that it cannot be entirely pulled into the baby’s mouth. Using a pacifier with an undersized shield poses high choking risk.
- Pacifiers degrade with use. Before offering, briefly inspect for cracks or parts coming loose. if you see any structural damage discard it. (We had 2 pacifiers cracking during 1 year).
- Do not attach the pacifier with cords or ribbons to the baby’s clothes or bed during unsupervised sleep. This poses strangulation risks.
- Never forcibly introduce a pacifier into a sleeping baby’s mouth.
The general considerations are mostly about what to look for when buying it. However, it is worth noting that each baby has their own preferences, you can’t force a baby to accept a specific pacifier.
General Considerations
- Each pacifier comes with a manufacturer’s age recommendation (0-3, 3-6, 6-12) on the box. If you are concerned about the sizing these are some rules of thumb.
- A pacifier that is too big will cause gagging, excessive drooling and its shield will be resting on your baby’s nose.
- A pacifier that is too small will leave imprint marks on the baby’s cheeks and nose. The baby will have difficulties holding it in their month and is likely to spit it out.
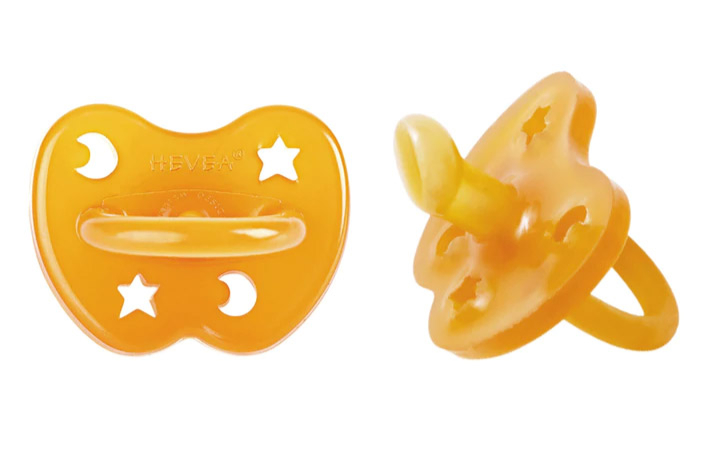
- Prefer soft silicone for the pacifier tip.
- A pacifier made from tougher materials creates more strain on mouth muscles.
- Latex can cause allergic reactions and is prone warping when sterilizing.
- Most silicone pacifiers from reputable brands are made of BPA-free food grade silicone (they will brag about it on the box).
- Avoid unnecessary weight, like plastic decorations on the shield. The extra weight makes it harder to keep in the mouth thus less comfortable.
- The shield should have perforations for airflow.
Breastfeeding and round pacifiers
Suction on a pacifier is mechanically different from a breast. To establish an effective breast latch, your baby needs to shape their mouth and tongue in a specific way that is different from the way they suck on a pacifier Introducing a pacifier too early can cause your baby to get confused and appear to “forget how to latch”, this is usually referred as nipple confusion
If your goal as a family is to breastfeed, the standard recommendation lactation consultants is to introduce a pacifier only after establishing strong breastfeeding patterns (usually 4-6 weeks).
On the other hand, if you are bottle-feeding you can introduce the pacifier from directly from birth. Extracting milk from a bottle demands less skill and effort from a newborn. In addition, a wide selection of bottle shapes exist, if one bottle teat does not work for any reasons you can easily try another. This is why you will sometimes see the term “pacifiers for bottle-fed babies” thrown around: with nipple confusion not being a relevant factor, the manufacturers can focus their design efforts elsewhere.
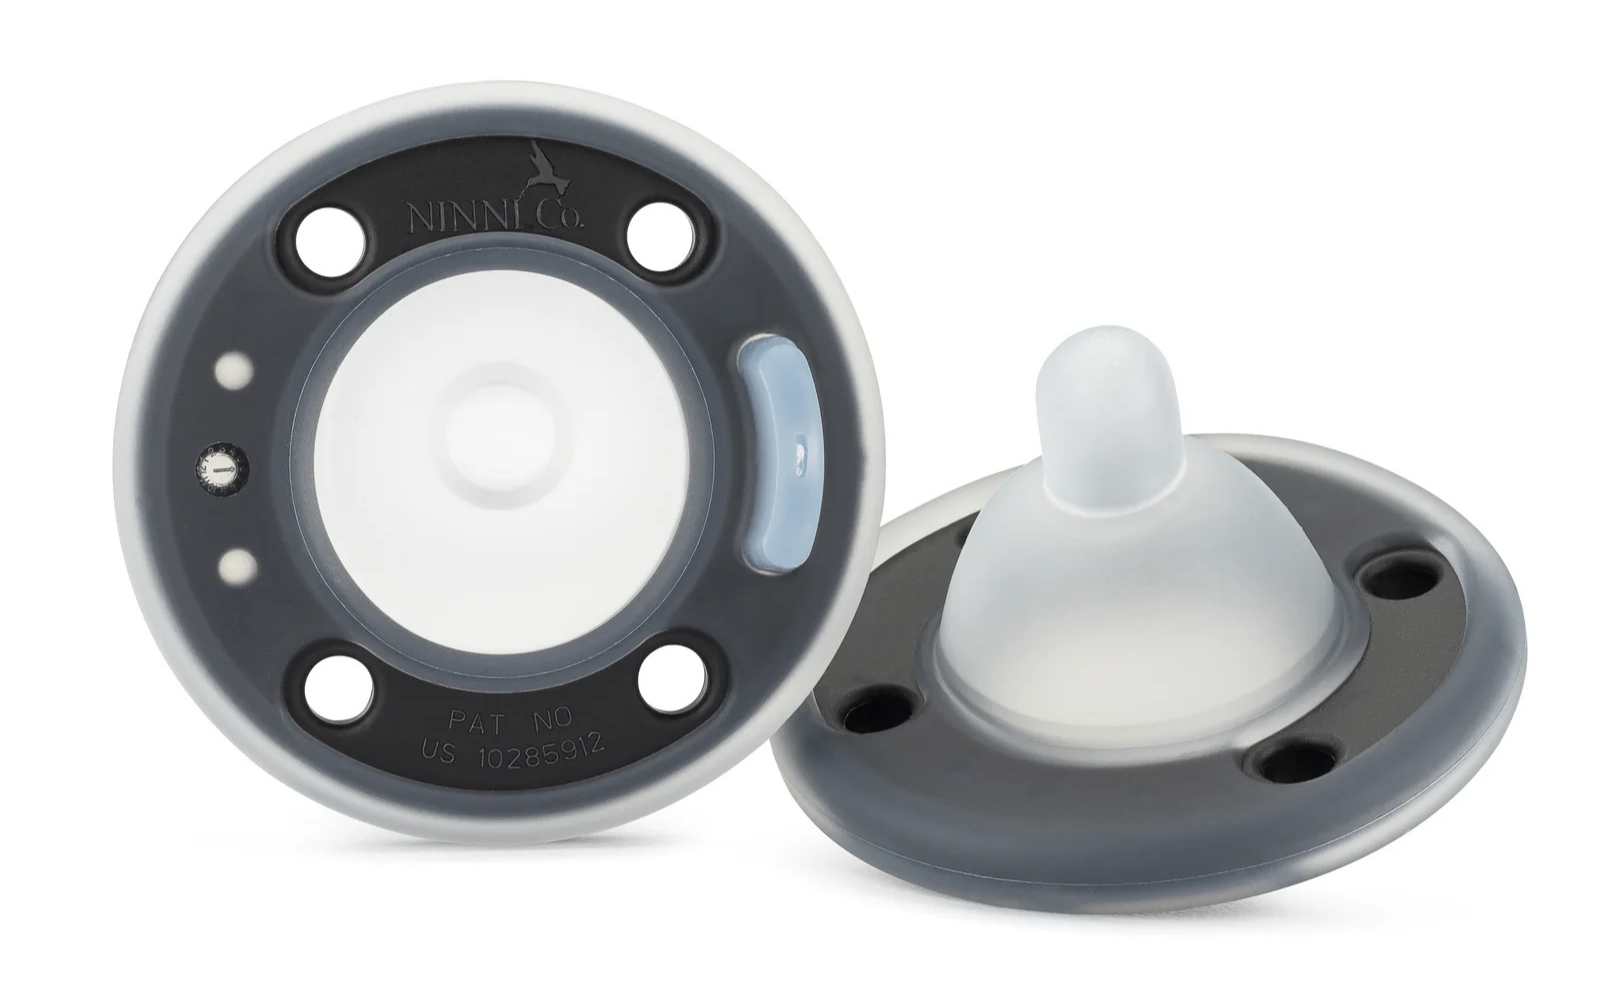
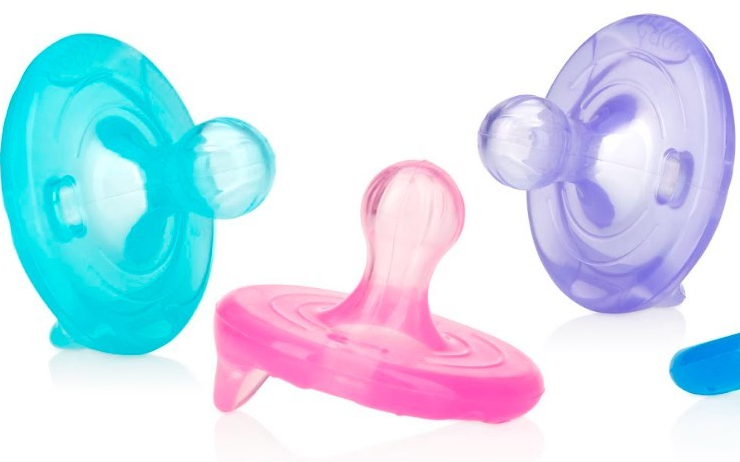
For breasted babies you should opt for pacifiers that:
- Are symmetrical on all axes.
- Have a rounded tip and a gradual slope.
- Have a wide base.
- Are made of soft silicone.
These designs try to emulate the shape of a nipple, hence should help prevent nipple-confusion. Ninni-co and Dr Brown’s pacifiers seem to be a popular choice in this category (the exact brand does not matter, the shape does).
Example of good shapes:
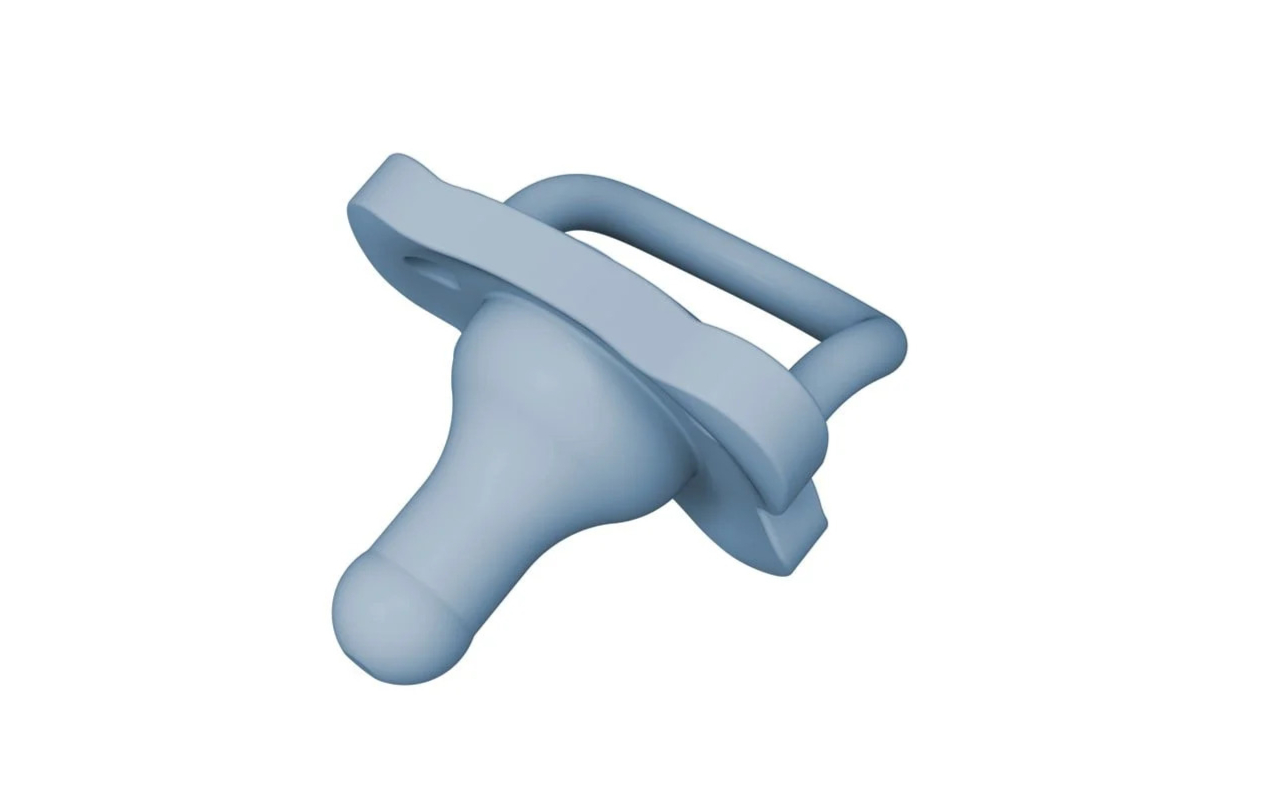
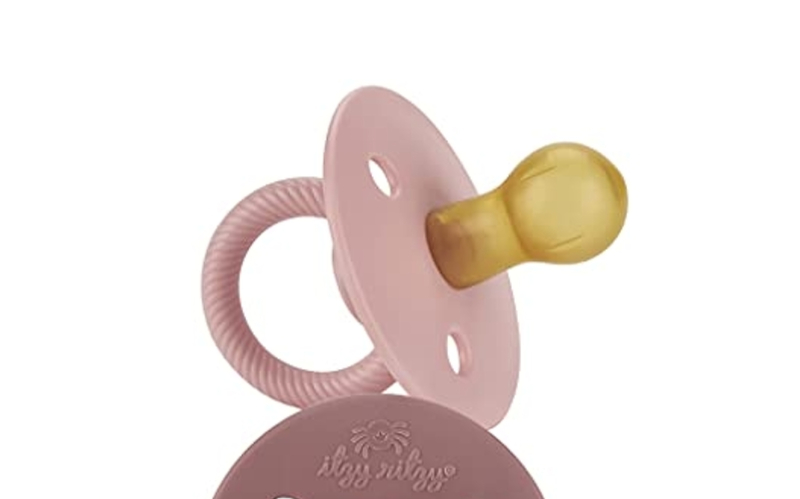
Avoid pacifiers with a significant “bulb” on the tip and shallow bases, these are sometimes referred as “cherry shaped”. As far as I understand they are easier for the baby to keep in their mount, but they can cause a shallow latch.
Example of bad shape:
Mouth development and Anatomical/Orthodontic Pacifiers
This style of pacifier is advertised as the better option in supporting mouth development and preventing misalignment of the teeth. They are asymmetrical and feature a narrower base with a wider tip.

However, there is little to no scientific evidence supporting this claim. The only relevant study I could find on the subject states the oposite.
According to Adair et al.: “No clinically significant differences were found between 24- to 59-month-old users of conventional and orthodontic pacifiers with respect to sagittal, vertical, and transverse occlusal relationships.”
On the flip side there seems to be consensus among pediatric dentists that early weaning and limiting the hours of use per day has the highest positive impact on preventing mouth and denture development issues.
For example The American Academy of Pediatric Dentistry in their
policy from
recommends weaning at 18 months with a hard cut-off at 36 month to avoid crossbite, overbite and dental malocclusion.
If mouth development is one of your concerns early weaning and limiting use is the better option.
When to wean off
There are several recommended ages when to wean off the pacifier. None of these except for the last one (3 year mark) are “set in stone”. The correct timing will depend on your particular case.
- 6-7 months: By this age most babies can self-soothe without a pacifier. At this age they have lower emotional attachment towards things (pacifiers included) making the weaning process easier.
- 12 months: The American Academy of Pediatric Dentistry states that prolonged pacifier usage after one year of age can increase the risk of acute otitis media (ear infections). Sources AAPD guidelines , Warren et al. and Jackson et al.
- 18 months: Pacifier use after one year and a half was linked to crossbite, overbite and improper teeth alignment.
- 36 months: Using a pacifier after the age of 3 can cause long-term dental issues which require medical intervention to fix. This age is “firm cut-off” point.
In our personal case, we used the pacifier only during sleep and had no complications, neither with ear infections nor with misaligned teeth. Since our daughter used it rarely she did not develop emotional attachment to it and simply stopped asking for the pacifier at around 16 months of age.
Regarding preterm babies
There is a special consideration when it comes to preterm babis that spend time in intensive care after birth. Your neonatologist will most likely suggest introducing a pacifier directly after birth.
When a baby’s moth muscles are not sufficiently developed to extract milk by themselves they will initially receive nutrition via a gastrointestinal tube. Removing the GI tube is one of the priorities on the neonatologist’s list. By introducing a pacifier early,
- The baby gets to exercise their mouth muscles, eventually developing the ability to feed by either breast or bottle.
- Sucking on a pacifier mitigates the risk for the baby loosing their sucking reflex.
- The soothing effects provided by pacifier helps with pain management during procedures and general emotional regulation.
You can read more on the topic here.
Warning
There is no advice in this section. The goal is only to provide some context for people that are in that situation and are wandering what’s the reasoning behind their doctor’s decision.
Infant car seats
While infant car seats function the same, different regulations and testing standards exist across distinct regions of the world. I’ll be focusing primarily on European Union here. This chapter will include links to different seat models, these are included as examples for clarity and are not product endorsements.
Sizes and groups
Car seats are categorized in broadly 3 groups:
| Group | Approximate age | Requirements | Description |
|---|---|---|---|
| Group 0 | 0 to 15 months | Height 40-85cm Weight <13 kg | Exclusively rear facing. Also known as bucket seats |
| Group 1 | 6 months to 4 years | Height 61-125cm Weight <22 kg | Rear and forward facing. Also known as combination seats |
| Group 2/3 | 4 to 12 years | Height 100-150cm Weight <40 kg | Exclusively forward facing. Also known as booster seats |
Warning
Child’s “age” does not matter and is included just for estimation purposes. What actually matters is baby’s height and weight. When your baby exceeds the maximum height or weight (whichever comes first) the car seat stops providing adequate protection and has to be changed. One of the most common errors resulting in injury is using an inappropriately sized car-seat. Always check the manual to ensure your child fits correctly.
I say “broadly” because some models are size-adjustable and can cover multiple groups.
-
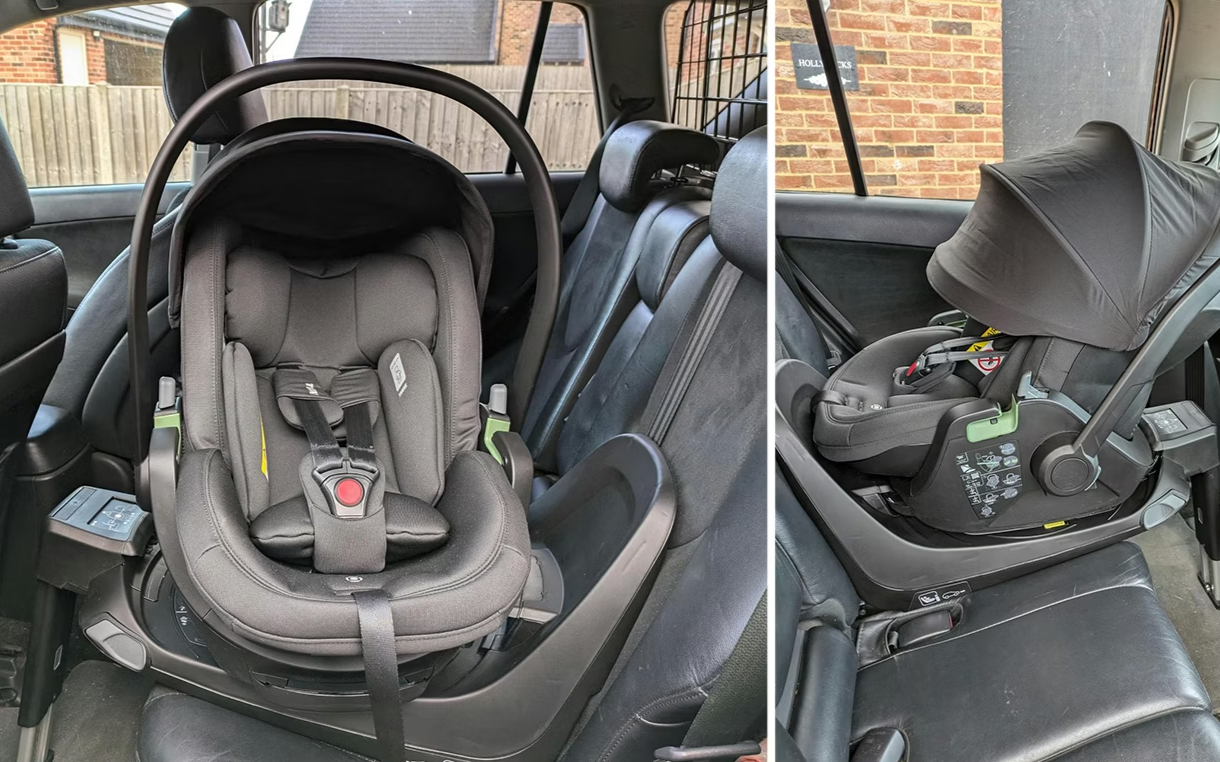
Bucket seats (group 0 exclusively): These are rear-facing and can be used until approximately one year of age. This is the only category that supports detaching the seat from the base while the child still strapped in and mounting the seat onto a 3-in-one modular travel system. It is a good option if you favor portability and not waking up the baby when the car-ride ends. For example Maxi Cosi 3 in 1. If you are considering a 3-in-1 travel system I encourage you to read about sleeping in a car seat.
-
Convertible car seats (both group 0 and 1): Opposed to the bucket seats described above these have a much larger usage span and generally last from birth to 4 years. They are bigger, heavier and not designed for portability (you can’t detach this seat from the base with the baby strapped in). This category support both forward and rearward facing positions and generally feature a rotating base for easier loading and unload of the child. For example Cybex Sirona T i-Size is such a seat.
-
Booster seats (both group 2 and 3): Are modular and change configuration based on child’s age: starting with
5-point-harness + high-back-boosterand progressively transition intohigh-back-booster + car's beltandno-back-booster + belt. An example of a seat in this group BeSafe Flex FIX. This category of seat is exclusively forward facing, does not rotate and is attached directly to the car’s car’s ISOFIX mounts. Usually much cheaper than seats of group 0 and 1. -
Evolutive car seats: These models cover all three groups and can be used from birth until your child can use the car’s seatbelt. The ergonomics sometimes suffer in favor of adjustability (depends on both the seat model and the child). This is by far the most cost-effective option. Chicco EVO i-size is a seat of such type.
To my knowledge most common route is to get a convertible car seat (birth to 4 years) and transition into a group 2/3 seat later.
Standards
- R129 also known as i-Size is the latest safety standard at the time of writing (2026). Any infant car seat sold in the EU since 2014 is required to have this certification. To obtain it, different seat models are tested for frontal(50 km/h), side(30km/h) and rear(30km/h) impacts. More about testing methodology in this article.
- R44 is the older mandatory standard. These car seats can still be legally used, but not sold by retailers. Unlike R129, these car seats are not rated for side-impacts. This is one of the main reasons they are being phased out.
- Swedish plus is a voluntary test manufacturers can undergo. It mostly focuses on frontal collisions measuring the forces applied to the neck and spine in case of an accident. Premium brands will have this certification in addition to the mandatory R129.
- ADAC is the german counterpart to the Swedish plus test. These tests are performed independently without manufacturer opt-in (the organization itself chooses what models to test). Evaluation results can be found on their official page. ADAC results for 2025
These accreditations will be mentioned on seller’s web-site or are present as a sticker on the seat itself.
Installation
ISOFIX
ISOFIX is a standardized European system for securing child car seats. It uses rigid connectors attached to the vehicle’s chassis for a more secure fit. These connectors are located on the backseats of the car, on the lower side of the backrest. All cars sold in europe since 2012 are required to have ISOFIX mounts, but even older cars are likely to have them.
Infant car seats can be installed either onto a dedicated base or secured using car’s 3 point harness.
The base is attached to the ISOFIX mounts and seat clicks into the base. Generally using a base allows you to rotate the seat by 90 degrees for loading and unloading your child. In my opinion the extra convenience of being able to rotate the seat is worth the extra cost of purchasing the base.
The ISOFIX mounting option is considered safer, as it eliminates a majority of common installation errors and reduces car-to-car variability.
Position in the car
The rear middle seat is the safest location in the car for an infant car seat, while the front passenger seat is the most dangerous.
Overall, the rear (2nd row) seating positions have a 29.1% (Univariate Analysis, p < .0001, OR 1.29, 95% CI 1.22 - 1.37) increased odds of survival over the first row seating positions and the rear middle seat has a 25%
Journal of Safety Research V39
Regulations differ from country to country, but as a generality infant car seats are not legally allowed to be installed in the front of the car besides special cases (for example car does not have rear seats or all rear-seats are occupied by other children).
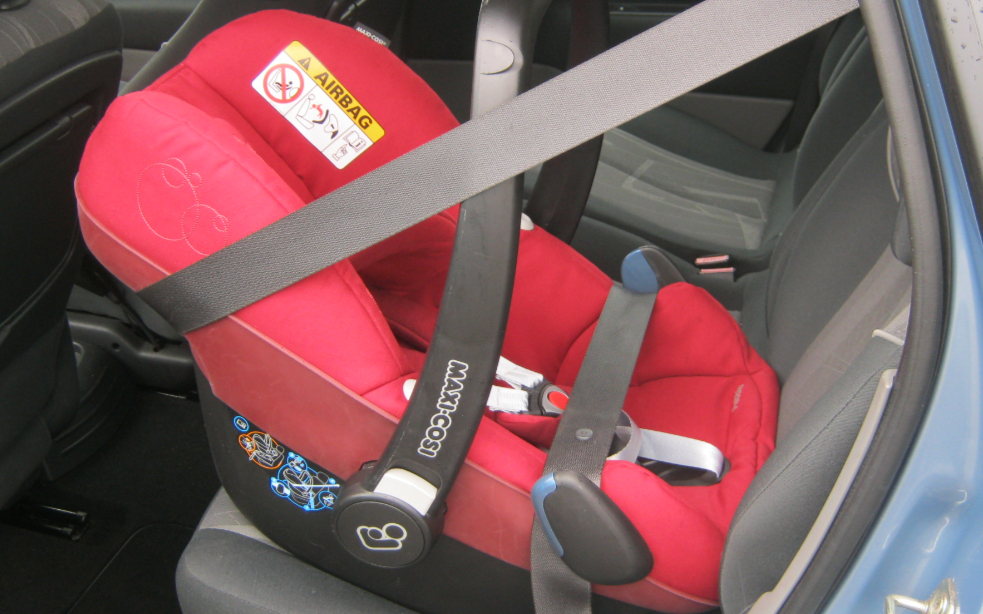
If the infant car-seat is installed in the front row of the car, in the majority of cars the car’s seat must be moved all the way back and the passenger air-bag is manually deactivated. A deployed airbag can propel a rear-facing infant car seat into the backrest potentially causing serious head and spine injury.
Warning
Correctly installing the infant car seat in the front row differs from car to car. Your car’s manual will have a chapter dedicated to this, you must read it and ensure it is done properly. Do not rely on generalities for this step.
The airbag must be turned off via mechanical means (usually a key on the side of passenger’s dashboard). Do not rely on software deactivation for this!
I recommend watching this video for more details on front installation.
Installing in the back is much less complicated, generally the side-airbags of the car should remain engaged, but always consult your car’s manual to ensure correct installation.
Forward or rear facing orientation
Babies between approximately 0 and 15 months must be seated rear-facing, failure to do so will result in a fine (beside it being a bad idea).
In EU children over 15 months are allowed to sit forward facing but is the less safe option. Based on this Swedish report from all fatal injuries from 1992 to 2024, 47% of fatalities could have been avoided if the child were restrained in a rear-facing car seat. Sweden has been one of the main advocates for rear-facing seating and their recommendations advocate for exclusive rear-facing seating as long as possible, at least until age of 4/5. The Folksam safety rating program from the same conference goes into some details.
Infant car seats in group 2/3 are almost exclusively forward facing. There are some group benders like the BeSafe beyond that allows rear-facing seating until approximately 6 years (125 cm height and 22kg), but it’s the only example so far. At this age children stop having enough legroom in a rear-facing position, and they weigh too much for the seat effectively manage the downwards rotation, so forward-facing sitting position is the only feasible option.
Warning
Never travel with your child facing sideways. It is extremely unsafe and illegal. I saw a staggering amount of people swivelling a car seat so it faces side window.
Sleeping in the car-seat
Is it safe to sleep in a car seat?
While the answer is quite straight-forward the guidelines seem to be in contradiction with each other:
According to safe sleep guidelines sleeping in baby containers is not allowed, and an infant car seat is a baby container, so no?
At the same time nhs advices taking breaks every 2 hours and not letting the baby sleep in a car seat that longer than necessary, so yes?.
Also why does it matter if the car is moving or not?
So what’s the danger and are you supposed to wake a child that fell asleep in a car seat?
The main risk of sleeping in a car seat is positional asphyxiation. The baby can slump forward or sideways obstructing their airways causing difficulty in breathing. This is an example of a dangerous position: Group 1 and 2 car seats are designed for the baby to sit in a semi-reclined 45-degree angle. Sitting at this angle provides the best protection in a crash while limiting the probability of positional asphyxiation during limited use. Research shows that the more time a newborn spends in the same position the higher the probability of positional asphyxiation.
The secondary risk of sleeping in the car seat is overheating. These seats are made of thick materials which retain heat. Excessive heat is one of the risk factors for SIDS considering the underdeveloped self-cooling mechanisms of a young baby.
Both of these risks can be managed by active adult supervision. So yes, a child can sleep for a short duration (1-2 hours) during trips while an adult is monitoring their position.
Why should you remove them from the car seat after the trip has ended: Notice that the actual seats in cars are tilted slightly backwards. The engineering of infant car seat takes that into account the car’s natural seat inclination and compensates for it. Placing a baby car seat on a flat surface increases the sitting angle and makes slumping much more likely. This also explains why 3-in-1 travel systems are generally considered safe for supervised sleep only when attached to a compatible base. The base is designed to offer an appropriate sleeping angle and there is an adult keeping an eye on the baby.
Warning
A car seat should never be used for unsupervised sleep.
Even positional asphyxiation aside, there are multiple reports of babies waking up and entrapping themselves on the belts, falling from elevated surfaces (in case the car seat is placed on a table) or injuring themselves by tumbling sideways together with the seat, or people forgetting a sleeping baby in a hot car.
Generally a bad idea. You should move the baby onto a suitable sleeping surface after the car ride has ended.
This is good blog post on the topic of car seat sleep safety
About used car seats
Used car seats should generally be avoided for these 2 reasons:
Infant car seats are rated for exactly one crash, and should be discarded after an accident. This is why you are not allowed to return or exchange a car seat after it exited the shop. Retailers can’t resell it as they can’t prove the seat was not involved in a crash.
Pro-tip: Brick and mortar shops will often have “showroom seats” that you can lease for a short duration. This allows you to test if the seat fits in your car and if your child sits conformably, before commiting.
Also, keep in mind that infant car seats expire—typically 6 to 10 years after they’re made. You can find the exact date on a sticker attached to the seat. Over time, heat and UV rays break down the plastic; even if no damage is visible on the outside, the internal foam (EPS) can degrade, failing to provide proper protection during a collision.
Purchasing a secondhand car seat requires you to rely on the seller’s honesty regarding its accident history while also verifying that the seat hasn’t reached its expiration date.
Extra safety features
This section goes through the distinct safety features different models of infant seats might have.
In truth, few people should care about this. To get the mandatory R129, any car-seat will be tested and is guaranteed to offer adequate protection. Some more premium brands might have multiple redundant protections, in case one system fails, the other one picks up the slack, but some skepticism is required: more addons does not necessarily mean safer. The only real way to know if a seat is safer than the other is via ADAC or Sweedish Plus or any other independent testing organization.
This section goes into some details on how this extra safely features work and what is their purpose.
Infant car seats have to manage three primary safety aspects: side impact protection, downwards rotation and ensuring the child is seated correctly.
Side impact protection
The R129 simulates a side-impact collision at 24km/h and benchmarks the forces acting on child’s head, neck and torso.
Virtually all modern baby car seats will feature a rigid outer shell made out of molded plastics and sometimes a steel reinforcement. Underneath it is a layer of shock absorbing materials, usually polystyrene and/or polypropylene.
In addition to this, some of the more premium brands will offer either a SIP or a pop-up crumple wings as a redundancy. A SIP (side impact protector) is detachable airbag that is mounted to the baby seat itself, one example of a seat featuring a SIP is BeSafe Beyond.
A crumple wing is an extendable wing that absorbs shocks and transfers it to seat’s shell (similar to a SIP), one example is the Cybex sirona.
Downward rotation
This is concerned with frontal impacts also tested by R129 at 50km/h.
In a sudden stop, inertia pushes the car seat forward and causes it to rotate. Once the vehicle stops completely, the seat may rebound, flipping back toward the car’s backrest. This behavior is called “downwards rotation” and “rebound” respectively.
The ISOFIX mounts or belts (depending on the installation mode) will do most of the heavy lifting here. A majority of models in group 0 will feature some sort of anti rebound bar. In case there is slack on the belts or the base is not correctly installed (and downwards rotation is not managed correctly) the anti-rebound bar acts as a barrier between the child and the backrest of the car.
The load-leg of the base serves a similar purpose, but instead of managing rebound, it ensures the seat does not rotate forward by anchoring it to the floor of the car.
A top tether functions the same as a load-leg. Instead of anchoring the seat to the floor of the car (push), it uses a third anchorage point that connects the top of the infant car seat to the car via an extra belt (pull).
Five point harness
The five point harness is not mandated by R129.
This type of harness prevents what is colloquially called “submarining”, where the child’s body slides down, causing the belt to move from their rib cage onto the softer abdominal area (potentially leading to internal injuries on emergency breaking).
By virtue of being more restrictive the five point harness does not allow incorrect seating positions and also prevents older babies from “escaping from the straps”.
Nipple confusion
Nipple confusion is when a baby has difficulties switching between the breast and a bottle. Sometimes this is called “flow preference” or “bottle preference”.
It manifests as difficulty latching after introducing bottle feeding in your routine. In order to establish an effective breast latch, your baby needs to shape their mouth and tongue in a specific way that is different from the way they suck on a pacifier or from the bottle. Additionally, bottle feeding requires less coordination, the flow is faster and there is no wait-time for milk let-down.
In some cases the baby will get confused and “loose form” which manifests as them having a shallow and painful latch. In others, they might become fussy or straight-up refuse to breastfeed as they develop a strong preference for the ease of the bottle.
Warning
Very often tongue-tie express itself as nipple confusion. If you are struggling with poor latching I highly recommend getting an “all clear” for that from an ENT specialist or your pediatrician first.
Prevention
To prevent nipple confusion it is most commonly recommended to wait until breastfeeding is well established (usually 4-6 weeks) before introducing a bottle into the feeding routine.
Lactation consultants also advice waiting the same amount before introducing a pacifier. However, there is less consensus about this, with studies showing conflicting outcomes on breastfeeding and the introduction of a pacifier being recommended by the safe sleep guidelines.
When introducing a bottle the paced bottle feeding technique is highly recommended. This technique has multiple advantages but its primary goal is to promote breastfeeding and avoid nipple confusion.
Slow flow bottles are preferred.
Remediation
If you have problems breastfeeding or suspect nipple confusion contact a lactation consultant as soon as possible. Early intervention is critical, the more you delay the less likely the lactation consultant will be able to help.
Tongue-tie
Unlike nipple-confusion which is about baby’s behavior and preference, tongue-tie (ankyloglossia) is a physical condition which can require medical intervention.
In some babies the lingual frenum (the membrane connecting the underside of a tongue to the floor of the mouth) is abnormally short or thick. The abnormal frenum limits the mobility of tongue causing poor latching and inefficient milk extraction. Babies with tongue-tie have low-weight gain and require excessively long and frequent breastfeeding sessions. This condition is common, genetically heritable and often runs in the family.
Tongue tie both exhibits like and reinforces bottle preference:
- Parents introduce supplementary bottle feeds as a means for their baby to gain weight.
- Baby develops a preference for the bottle as extracting milk from the bottle does not require the same tongue mobility needed to breastfeed.
You can read more about it from UK’s NHS.
It is also worth noting that there are different levels of severity for tongue tie, and there is a change for light to mild cases to go undiagnosed for long. In our case, my daughter had a mild manifestation of this abnormality, and it went unnoticed even after several consultations with different lactation specialist. It got finally detected when we went to see a pediatric Otolaryngologist (ENT doctor). Obviously this is an anecdotal example, and it does not mean your case will be the same, it’s just something to be aware of.
Tongue-tie is treated with a frenectomy.
A frenectomy is minor surgery where the doctor cuts frenum to restore mobility of the tongue.
The procedure is complete within seconds, performed without anesthetic, and does not require hospitalization.
However after the procedure you might be instructed to perform post-frenectomy massages at home for several weeks. These exercises are designed to prevent frenum reattachment and premature closing of the wound. Performing these massage is highly unpleasant, both for the baby and for the caregiver.
There is ongoing debate about the efficacy of these post-frenectomy massages, but this is a discussion you must have with your ENT. More info can be found here.
Paced bottle feeding
Unlike traditional bottle feeding which uses continuous flow, paced feeding replicates breastfeeding’s rhythm of suck–swallow–pause. While this technique is often used to prevent nipple confusion in babies who switch between breast and bottle, its advantages make it a good choice for exclusively bottle-fed babies as well.
The core goal of this technique is to reduce the flow of milk, requiring the baby to actively suck to extract it. This is a shift from traditional feeding, where gravity does the work and milk is essentially poured into the baby’s mouth.
How to
A paced bottle-feed should typically take around 10-20 minutes, similar length as a breastfeeding session. These are not hard numbers, just general reference points to queue you in whether the pace is right.
The baby should be sitting semi-upright in your lap at around 50 degrees angle. Always use your hand to support their neck and upper back.
Alternatively you can place the baby laying down and sideways on a pillow in your lap. They should be facing to the side with their backside touching your abdomen. In my experience this is more conformable both for the baby and the caregiver. The side-laying position is especially good for night feeds since it allows to eat while drowsy.
After placing the baby, touch the bottle tip to their upper lip, and wait for the baby to open the mouth and accept the bottle.
Maintain the bottle is a somewhat horizontal position.
The bottle should be inclined enough so the tip is always full but not as inclined so gravity forces the milk out of the bottle.
The actual angle of the bottle needs to be constantly adjusted depending on how much milk is left in the bottle.
A good litmus test for the correct angle: The tip of the teat is full, the base of the teat is not.
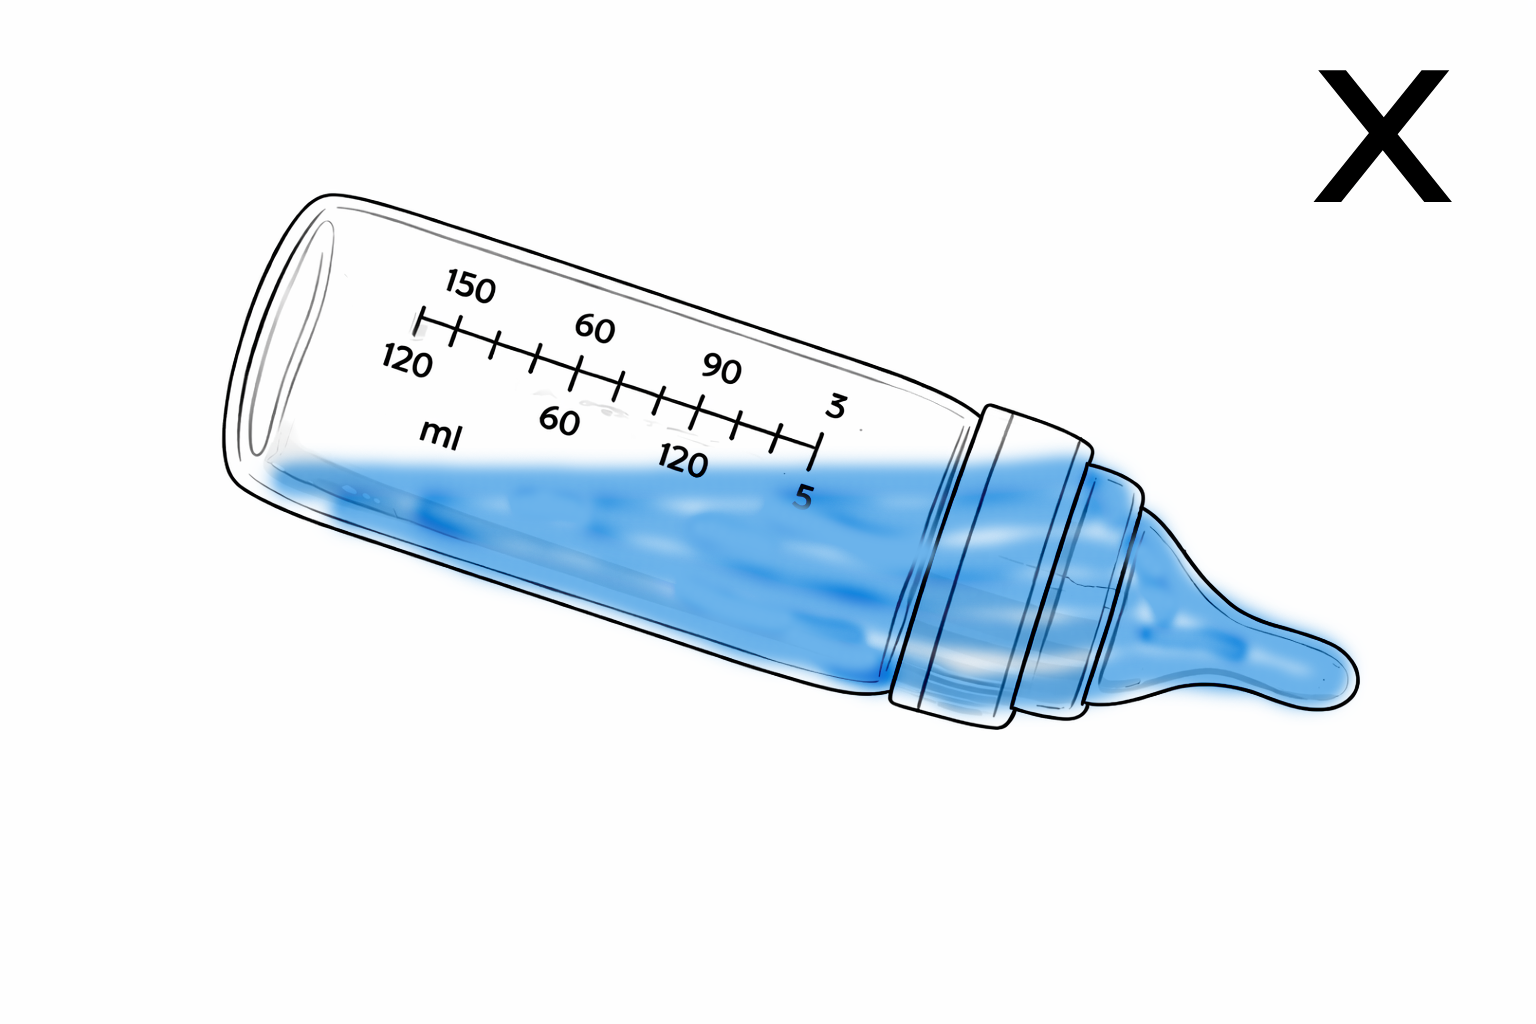
Bad angle examples:
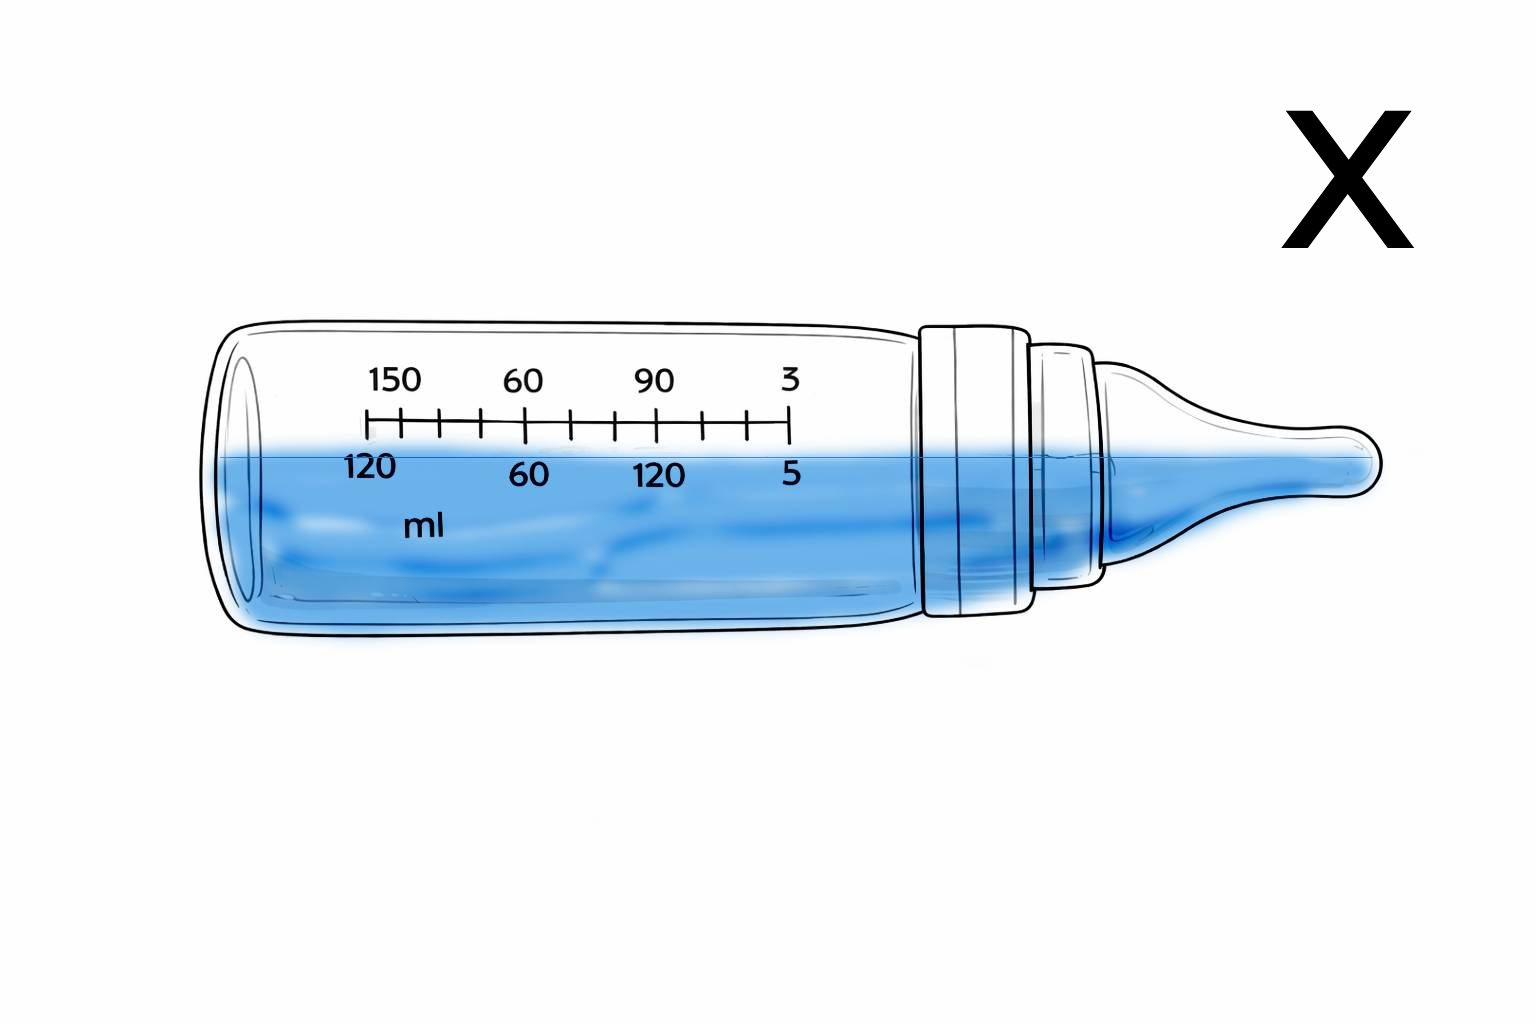
In the picture to the left the angle is not steep enough, the tip is not full. The baby should ingest air together with the milk, it causes digestive discomfort.
In the picture to the right the angle is slightly too steep, the base of the teat should not be full. A steep angle can make your baby take too much milk in one gulp.
Good angle
In the picture above the angle is correct: The tip is full so no air will be ingested. Bottle is not too inclined so that gravity forces milk out of the teat.
Let the baby suck on the bottle for around 20-30 seconds, then lower the bottle to a horizontal position so the nipple tip
is totally empty. This simulates the breastfeeding let-down pause.
Note: During pauses the baby might gulp air by sucking on the empty teat, this is ok.
Counterintuitively they swallow less air with a fully empty teat than they would have with a partially filled teat.
If the air swallowed in such a manner becomes problem for you, you can remove the bottle all together from their mouth during breaks.
This did not work for me, my daughter got very angry every time I tried removing the bottle from her mouth.
This is an excellent short video demonstration of paced bottle feeding.
Advantages of paced bottle feeding
Prevents over-feeding
You might have heard that “you can’t overfeed a breast-fed baby”. Extracting milk from a breast is an active process, when the baby stops being hungry they can just stop sucking and the meal ends. Receiving milk from a bottle with traditional bottle feeding techniques is a passive activity, gravity pulls the milk into baby’s mouth and their only option is to swallow it. By letting the baby “do the work” and extract the milk by themselves the risk of overfeeding is eliminated.
Reduces Gas and Reflux
Because the milk flow is not continuous, and we include frequent pauses for breathing, the baby avoids gulping or gasping for air. This controlled pace ensures the baby ingests significantly less air, which helps prevent digestive discomfort.
Avoids nipple confusion/flow preference
(This applies only to babies who switch between breast and bottle)
Bottle nipples require less effort the active sucking needed to trigger milk letdown. Flow preference refers to the situation where the baby gets accustomed to the faster flow and refuses to breastfeed. By incorporating regular breaks and encouraging a natural suck–swallow–pause rhythm paced feeding lowers the risk of your baby developing bottle preference .
Prevents the baby choking on milk
Especially early on, some babies have difficulty managing breathing and eating at the same time.
They will breathe in while trying to swallow at the same time, which makes them choke.
Reducing the flow of milk and offering constant pauses helps them manage better the suck–swallow–breathe rhythm.
Baby formula
Breastfeeding vs Formula
Every public health organization will encourage exclusive breastfeeding for at least the first 6 months of life. There is good reason for that: For one breast milk is the most nutritionally complete food a newborn can eat. In addition, breast milk allows antibodies from the mother to pass to the infant via the milk, effectively short-term boosting their immune system.
This gave us the omnipresent “Breast is best” slogan. I’m neither qualified nor I have the intention to disagree; However, it is quite common for “breast is best” to transform into “breast is the only option”. In this section I will argue that “Breast is best, but formula is also OK”.
Some important background: Starting around 1920 formula manufacturers began aggressively marketing it as a better alternative to breast milk.
These marketing tactics are now widely considered as predatory, reaching levels where physicians were being paid to convince new parents to switch
to formula feeding alleging false health benefits.
This led to a steady decrease in breastfeeding rates across the world, creating suboptimal health outcomes.
This was especially pronounced in the underdeveloped regions where access to clean water and sanitary conditions of preparation is limited.
As a response WorldHealthOrganization and Unicef created the Baby-Friendly Hospital Initiative, which instructs health professionals on providing guidance and promoting breastfeeding. You can read more about this from WorldHealthAssociation directly or from here. Overall a positive change, but it had the unfortunate outcome where in some cases “encouragement” becomes societal pressure (E Grattan et al).
In addition to the above, there is another complicating factor:
All research on breastfeeding is observational. Instead of a designed study with randomized groups,
participants self-select into breastfeeding vs non-breastfeeding groups (for obvious ethical reasons researcher’s can’t discourage breastfeeding to “see what happens”).
Families with high socio-economic status are more likely to breastfeed (Martje Van Neste et. al.) but the same cohort of people
have access to better medical care, not smoke, be better informed on safe sleep practices and in general have more positive health outcomes. With all these confounding factors attributing a particular benefit to breastfeeding becomes tenuous.
The PROBIT and the Improved Estimates of the Benefits of Breastfeeding Using Sibling Comparisons to Reduce Selection Bias studies
try to address this bias and concluded that
nonexperimental studies of breastfeeding overstate some of its other long-term benefits, even if controls are included for race, ethnicity, income, and education.
Hank Green explains much more eloquently this point in this 13 minute SciShow video.
The point I’m trying to make here: Even trustworthy sources will occasionally oversell the benefits of breastfeeding while casting formula in an exaggerated negative light. Sometimes even the scientific community over-corrects and swings in the opposite end of the spectrum.
If a mother desires and is able to breastfeed exclusive breastfeeding until 6 months is indeed the ideal option. If not formula feeding or supplementing is also a perfectly viable option. Baby formula is one of the most tightly regulated food items on the market and is the only existing alternative to breast-milk suitable for newborns. In 2026 only 52% of newborns were exclusively breastfed for the first 6 months.
[!WARNING] All of the above applies to a healthy baby that was delivered on term. Babies born preterm or with very low weight are at higher risk for Necrotizing Enterocolitis. Human milk has a demonstrated protective effect against this disease.
Bacteria and the role of hygiene in formula preparation
This section contextualizes why preparation guidelines were created and what they are designed to protect against. With context established the reasoning behind every “step” should become self-evident.
Guidelines for the preparation and storage of powdered infant formula focus primarily on preventing contamination and limiting bacterial growth. The two main risks are Cronobacter sakazakii (Enterobacter) and Salmonella enterica contamination. PMC6874386. These bacteria occur naturally in the environment and pose little threat to a healthy adult but can be dangerous to a newborns. While all infants are vulnerable, those under two months face a heightened risk, and babies born prematurely or with weakened immune systems are in the highest risk category.
Both above-mentioned bacteria can survive in dormant form even in dry environments but start rapidly multiplying when water is introduced.
While contracting a disease from these bacteria is unlikely, proper handling is essential since these infections can be extremely serious if they do occur. According to sections 1.2.1 and 1.2.2 of the WHO report on safe formula handling and PMC6874386
In the United States of America, an incidence rate of 1 per 100 000 infants for E. sakazakii infection has been reported. (2006)
The United States of America reported a salmonellosis incidence rate of 139.4 cases per 100 000 infants in 2002.
(E. sakazakii ) It has an incidence of 2–5% in premature infants and 13% in those weighing less than 1.5 kg at birth.
Powdered infant formula can get contaminated in three ways:
- During production: Formula manufacturing is strictly regulated and plants are often inspected but PIF is not a sterile product. Although rare, contamination sometimes occur during production. When this contamination is detected the affected batch is recalled.
- From water used for mixing.
- From the environment during preparation. (dirty surfaces, unsanitized hands etc.)
By following proper preparation procedure both the risk of contamination is greatly reduced, but also ensures any potential bacteria already present in the powder is not allowed to multiply, so it can be handled by the newborn’s immune system.
Tap or bottled Watter
Using boiled tap water is the most common way to prepare baby formula, assuming your tap water is safe for human consumption.
Some countries add fluoride to their drinking water supply for its beneficial effect on dental health. Fluoridated tap water is considered safe for formula preparation and health authorities don’t currently advise parents against using it. If water fluoridation is one of your concerns see Annex: Fluoride in tap water for a deeper dive.
Bottled water is not recommended for formula preparation. Just like tap water it is not sterile and needs to be boiled before mixing. Additionally, bottled water can contain a high level of sodium (which can cause salt toxicity in newborns PMC4500422) and other minerals that can put strain on infant’s kidneys.
If you must use bottled water, avoid natural mineral water and opt for low mineralization water instead:
Ideally the bottled water for formula preparation has a dry residue <250 mg/L and sodium <20mg/L (non-academical sources glenaqua.es and hydrasana.com)
These numbers are not set-in-stone but should give you a frame of reference.
For scale: a popular high minerality natural water in my region has a dry residue of 3052 mg/L and a sodium content of 1097 mg/L, making it clearly unsuitable for infant consumption.
Boiling and water temperature when mixing
Guidelines from both the NHS and WHO instruct boiling the water and mixing the powder while the water is at no less than 70 degrees Celsius.
Boil the water. Then leave the water to cool for no more than 30 minutes, so that it remains at a temperature of at least 70C. NHS
Taking care to avoid scalds, pour the appropriate amount of boiled water, which has been allowed to cool slightly, but not below 70 °C. WHO
CDC on the other hand recommends using cold tap water for most cases CDC - formula preparation and storage but boiling and mixing at 70 degrees only for high-risk groups: less than 2 months old, born prematurely or ones with weakened immune systems. CDC - extra precautions
To make things even more confusing the preparation instructions on some cans of formula instruct the caretaker to boil the water but cool it to less than 40 degrees before adding the powder. For example instructions on Nestle’s NAN 1 Infant Formula
Why these guidelines differ and what’s the right way to do it?
Firstly by boiling the water any potential bacteria contained in water is eliminated, secondly by adding the powder in at 70 degrees or above any potential bacteria already present in the powder is destroyed. This way of preparing PIF is the safest and virtually removes all possibilities for getting sick from Cronobacter. See Bacteria and hygiene in PIF preparation and NEC for a more detailed explanation.
Why then the contradictory recommendation from CDC and formula manufacturers?
Some modern formulations of baby powder contain probiotics which are destroyed when the powder is mixed with hot water. If your chosen formula brand has added probiotics or other heat-sensitive ingredients it will likely instruct you to mix the powder with cold water.
Secondly, boiling water before every feed (once every 3 hours) is highly impractical in a household setting, often making caretakers prepare large batches at once and storing them improperly.
What I ended up doing myself:
I am against preparing formula in large batches. While it is safe to store formula at <5 Celsius for up to 24 hours, if my fridge fails to maintain the low temperature for any reason (power outage, door left open, fauly sensor, etc) any contaminants in the already mixed feed will multiply aggressively.
By using room temperature water and mixing one feed at a time before serving I can ensure that in the unlikely chance that bacteria is present in the powder, it does not get a chance to multiply and it can be handled by my daughter’s immune response. I used pre-boiled watter (that was stored in the same pot used for boiling, with the lid on)
Choosing formula brands
Work in progress.
Annex: Fluoride in tap water
Fluoride is a naturally occurring mineral that is often added to drinking water supply for its beneficial effect on dental health. In very high doses this mineral becomes toxic, and often in online forums concerns are raised around using fluoridated tap water for formula preparation. The reasoning behind this concern is that formula-fed newborns will consume much more fluoride per kg of body weight than a breastfed baby or an adult.
Water fluoridation was not a particular concern in our case and we used boiled tap water for preparing infant formula, but I feel this topic deserves representation and some scrutiny as it is very often miss-represented.
The impossibility of acute fluoride poisoning from fluoridated tap water:
In the US the maximum allowed fluoride concentration in tap water is 0.7mg/L while in europe the maximum permissible concentration is at 1.3mg/L.
In high concentrations fluoride is indeed toxic, the lethal dose for an adult is 64mg/kg of body weight.
Babies are not adults, but extrapolating it would mean that a 3kg baby would need to consume 274 liters of water in one sitting suffer deadly fluoride poisoning (3*64/0.7).
In concentrations of 0.3 mg/kg of body weight fluoride is not life-threatening but can cause gastrointestinal discomfort. That would mean that the same 3kg baby would need to consume more than one liter of water in one sitting to experience the side effect. Reference numbers from wikipedia and US National Institute of Health. Obviously these numbers are ridiculous, which is corroborated by the reference material.
This dose would be virtually impossible to achieve from water or toothpaste containing standard levels of added fluoride.
Historically, most cases of acute fluoride toxicity have followed accidental ingestion of sodium fluoride based insecticides or rodenticides.[10] Currently, in advanced countries, most cases of fluoride exposure are due to the ingestion of dental fluoride products
Effects of long term exposure to fluoride:
Things are less clear-cut when conversation shifts towards the side effects of long term exposure to smaller doses. The scientific consensus leans towards “artificially fluoridated water is safe for formula preparation” but there is some debate for this.
One of most common effects of prolonged intake of high levels of fluoride is dental and skeletal fluorosis.
Dental fluorosis
Dental fluorosis is a cosmetic condition that alters the appearance of the tooth enamel, changing its color to a more yellow tint. The effects are cosmetic only, does not affect tooth function and is not painful CDC article. To reduce the risk of dental fluorosis EFSA (European Food Safety Authority) recommends an intake of maximum 0.05mg fluoride per kg of body weight per day.
Balancing the benefits of caries prevention against the risk of dental fluorosis, EFSA recommended an AI of 0.05 mg fluoride/kg b.w. per day from all sources for children and adults, PMC7261729
The hypothetical 3kg baby used for calculations would need to consume around 2 liters of fluoridated water at 0.7mg/liter to be at risk of dental fluorosis. Developing dental fluorosis from drinking water alone is possible but very unlikely.
Skeletal fluorosis
Skeletal is a bone disease caused by deficient mineralization of the bones making them more prone to fractures. This is a more serious condition but is reversible in some cases if fluoride intake is stopped.
Skeletal fluorosis is endemic in several countries where the potable water sources naturally contain high fluoride levels (>4 mg/L), and where water consumption is high due to hot climates (EFSA 2013). Fluoride intakes of above 6–8 mg/day may increase the risk of bone fractures PMC7261729
At fluoridation levels of 0.7 mg/L to consume 6 mg of fluoride one must drink around 8.5 liters of water daily for a significant amount of time.
Association between IQ and fluoride consumption
Some studies point out an association between diminished non-verbal intellectual abilities and water fluoridation.
Exposure to increasing levels of fluoride in tap water was associated with diminished non-verbal intellectual abilities; the effect was more pronounced among formula-fed children. PMC6913880
Others claim no correlation and re-state the safety of water fluoridation.
This population-based follow-up study has provided consistent scientific evidence that early-life exposure to fluoride was not negatively associated with cognitive neurodevelopment. The findings, in combination with the current body of knowledge, provide assurance that the currently practiced WF programs are both effective and safe for young children. PMC11843800
These meta-analyses show that fluoride exposure relevant to community water fluoridation is not associated with lower IQ scores in children. S0033350623000938
This rapid systematic review indicates that community water fluoridation at concentrations between 0.7 and 1.0 mg/L is not associated with adverse nondental health effects in the general population. However, exposures exceeding the WHO guideline of 1.5 mg/L may increase risk of health effects, particularly among children and other susceptible groups. S2161831325001851
In conclusion: At current maximum allowed levels of fluoridation 0.7mg/L in US and 1.3mg/L in EU developing negative health outcomes from consuming fluoridated water is virtually impossible. Fluoridated water is considered safe for formula preparation and health authorities don’t currently advise parents against using it.
Annex: NEC and Preterm or Low birth weight infants
Necrotizing enterocolitis is life-threatening gastrointestinal disease affecting predominantly newborn babies. The exact cause for it is unknown. It manifests as an inflammation of the intestine which allows bacteria to infiltrate the colon tissue. More about it here.
This disease typically occurs in 2-6 weeks after birth.
Babies born with low weight or under 28 weeks of gestation are especially vulnerable.
It affects 2-5% of premature infants according to the study Jacob G. Ginglen, Nikolai Butki.
Formula feeding has been identified as one of the primary risk factors for developing NEC. Studies like A. Lucas and T.J Cole suggest a 6-10 times decrease in incidence for breastfed babies, and 3 times less common in babies who were mixed fed. (I can’t find the original paper, sorry).
For high risk babies, breastfeeding is highly encouraged for this reason. In case breastfeeding is not feasible, some NICU units offer access to pasteurized donor milk.
If formula feeding is the only option, WHO recommends using Sterile ready-to-feed (RTF) infant formula when possible. It is pasteurized during production and has the lowest risk of being contaminated during handling by the caretaker.
Where feasible, sterile liquid infant formula should be used in care settings, especially when feeding highrisk infants. These feeds do not contain harmful bacteria. Care settings, such as neonatal intensive care units, provide care for infants at greatest risk of E. sakazakii infection, i.e. neonates and those less than two months of age. However, sterile liquid infant formula is not always available (e.g. for infants who have special dietary needs), and PIF might be used instead.
Section 2.2.1 of Safe preparation, storage and handling of powdered infant formula Guidelines
If you are in this situation, definitely have discussion with your healthcare professional and do not rely on general guidelines.